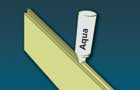
 ACTIVATE ACTIVATEWet the tongue with water by using the Kaindl Aqua Applicator. |
 CONNECT CONNECTPush the panels easily with hammer and push-block together. |
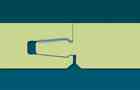 MERGE MERGEThe panels are firmly joined together due to the pre-glued Snap plus connection. |
Installation Instruction:
In order to
carry out the installation work you will need:
Aqua Applicator, spacers, push block, pull-iron, saw, hammer (min.
500 g) pencil, and straight edge. Please make a point of using only
the Kaindl accessories be-cause these have been designed specially for
working with Snap by Kaindl. Once a package has been opened its
contents of a pack should be used with-out delay.
Snap Plus by Kaindl is installed floating - the tongue and groove are me-chanically locked together by the Snap Profile and secured by the glue already applied at the Kaindl Works! Under no circumstances may panels be glued, nailed, or otherwise fixed (e.g. door stopper) to the underfloor.
Wood needs room to expand. A space of 10-15 mm should always be left between the panels and the walls or any other fixed elements (such as heating pipes or doorframes). Installation should be carried out at a room tempera-ture of at least 18°C and a floor tempera-ture of 15°C. The relative humidity should be < 70%. The temperature difference between the panels and the substrate should not exceed ±3°C.
The sub-floor must be absolutely level, dry, clean, and firm (old fixed carpet must be removed). Differences in floor level of more than 3 mm must either be sanded down or filled in with filling compound.
For damp insulation, (cement, tiles, etc.) first lay a polyethylene film (0.2 mm in thickness). The seams of the film should overlap by at least 20 cm and must be taped.
For footstep sound insulation use a special underlay such as Kaindl Protec-tion Matting. The seams should be laid in the same direction as the panels. Snap Plus by Kaindl panels should preferably be installed longitudinally to the main light source.
For installation on underfloor heating please comply with the special instruc-tions. You can obtain these from your Snap Plus by Kaindl dealer.
Expansion joints (at least 2 cm in width) must be fitted between adjoining rooms and also in rooms measuring more than 10 metres in the direction of the panel length and more than 8 metres in the direction of the panel width.
Please comply exactly with the installation instructions. No complaints can be accepted in cases of faulty installation.
Installation:
With the first row of panels, remove the tongue and place this side against the wall.
Check the distance to the wall (of at least 10- 15 mm) with a spacer and set straight. In the case of rooms having a length greater than 7 metres you should allow a special distance from the wall of 1.4 mm per for each metre of room length at both sides of the room.
For accurate cutting of the last panel in the row, rotate this through 180° and, with the pattern side upwards, place beside the already installed row (groove-to-groove).
Allow for distance from wall at end of panel. Mark out offcut and saw off.
Always saw from the upper surface of the panel (to avoid splintering the edges) - only when using an electric jig saw or a hand-held circular saw should the patterned side be placed facing downwards.
If the wall is not straight:
Place panels straight then use a spacer or similar instrument to mark the actual line of the wall on the first row of panels.
Saw the panels longitudinally according to the marking.
Also, the first row of panels must be cut longitudinally if the final row of panels is going to be narrower than 5 cm.
Start each new row with the left-over piece from the preceding row. The transverse joints must be offset by at least 40 cm.
Please take particular care to ensure that the first three rows are perfectly straight.
From the second row of panels onwards the tongue of the longitudinal side of the panel must first be wetted by the Aqua Applicator. By this means the glue already applied at the Kaindl Works is reactivated. Take care to ensure that the tongue flanks are adequately and uniformly wetted with water. Once they have been wetted the panels must be installed without further delay. Any excess water (on the underfloor and panel) is to be removed immediately.
Carefully fit the panels together with the aid of the hammer and the push block. Start by interlocking the flat-lying longitudinal edge. Begin with a panel corner, taking care to ensure the correct elevation of the panels. Only then fit together the transverse joints. However, before fitting the panels you should bring them as near to their final position on the floor as possible.
Fit the last panel in the row with the aid of the pull-iron.
Apply only as much force as is absolutely necessary. Once the first three rows have been interlocked, move them into the final position and fix them next to the walls with spacers so that they cannot move.
Where there are heating pipes or room dividers:
Position the panel row so that a transverse joint coincides with the pipe.
First cut the panel to the correct length.
Then lay the panel section beside the actual position, measure the recesses with the ruler and draw in.
Now drill out the marked sections.
Remember the necessary distance (10-15 mm) on each side.
Join up the sawn off piece again tightly behind the heating pipe (using the spacer).
When a doorframe has to be shortened:
Lay a panel next to the frame (with the patterned side facing downwards).
Cut into the doorframe with the straight back saw.
Then slide the panel under the frame with the patterned side upwards.
Don't forget to allow for freedom of movement here, too.
To finish off:
Measure the exact width of the last panel row.
To do this lay a panel on the previous panel row.
Then lay a
second panel on the panel to be measured with the tongue to the wall
and
use as a straight edge and saw the panel along the marking.
And please not forget the wall spacing!
Fit the last panel carefully using the pull-iron. Finished !
Allow an interval of 24 hours before walking or placing furniture on the newly installed Snap Plus floor.
Cleaning:
Simply clean Snap by Kaindl with a soft broom or a vacuum cleaner.
Wipe off footmarks and clinging dirt with a wrung-out moist cloth. Do not use wet cloths.
Do not attempt to clean Snap Plus by Kaindl with wax, polish, or scouring materials.
Stubborn stains can be removed with special stain remover.
For regular cleaning and maintenance we recommend K-Floor Laminate Cleaner.
Care:
Lay dirt-absorbing mats in areas of high dirt incidence (such as entrance halls and hallways).
Fit felt tips to the feet of your furniture and fit soft rubber casters to mobile furniture.
The ideal indoor climate is 20-22°C, 50-60% relative humidity. Extreme fluctuations in the indoor climate may cause slight deformation of the panels and the formation of minor joints in the floor.
© Kaindl Flooring, www.kaindl.com.hk